Android UI Design – जैसाकि हमने पहले भी बताया कि हम एक ही User Interface को कई तरीकों से Develop कर सकते हैं और पिछले Chapter में एक Simple Example द्वारा Direct Java Codes के माध्यम से UI Create किया भी था। लेकिन हमें हमेंशा Activity के Visual Part (Layout View) को Logic Part (Java Codes) से अलग रखना चाहिए और इसीलिए Activity के Layout को हमेंशा XML File के रूप में ही Define करना चाहिए।
Android App GUI को XML File के रूप में Develop करना काफी सुविधाजनक होता है, क्योंकि Android Studio का प्रयोग करते हुए हम बिना एक भी Line का Manual XML Code लिखे हुए भी अपने Android App के User Interface Layout को Drag and Drop तकनीक का प्रयोग करते हुए Visually Design कर सकते हैं और जब हम Android Framework के Standard Approach का प्रयोग करते हुए Model, View, Controller (MVC) Pattern पर आधारित Android App Develop करते हैं, तो इस तरह से Develop किए गए Android App को Control, Manage व Extend करना भी काफी आसान होता है।
जब हम Android Studio का प्रयोग करते हुए अपने Android App का User Interface Visually Create करना चाहते हैं, तब हमें Android Studio से थोड़ा और Familiar होना होता है और निम्न चित्रानुसार कुछ और Tools के बारे में जानना होता है:
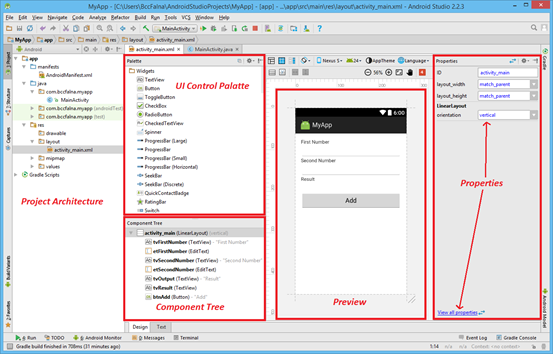
जब हम अपने Android App की किसी Activity से सम्बंधित XML Layout File को Open करते हैं, तब हमारे सामने जो Android Studio IDE Display होता है, वो उपरोक्त चित्रानुसार होता है, जहां UI Control Palette Section में वे सभी View Objects अथवा UI Controls होते हैं, जिन्हें Drag n Drop तकनीक द्वारा Preview Section में दिखाई देने वाले Screen पर Place कर सकते हैं और मजे की बात ये है कि हम इस Screen पर किसी Control को जैसे Place करते हैं, Output Screen पर वह हमें Exactly वैसा ही दिखाई देता है। इसलिए App Design करते समय ही हमें पता होता है कि हमारा App किसी Android Device पर कैसा दिखाई देने वाला है।
इस Preview Screen पर हम जिस UI Control को जिस Sequence में Place करते हैं, उसी Sequence के आधार पर एक Component Tree Create होती है, जिसे Component Tree Section में देखा जा सकता है और इस Component Tree Section की विशेषता ये है कि यदि हम Preview Screen पर किसी Control की Position Change करते हैं, तो उसी के अनुरूप इस Component Tree में भी परिवर्तन हो जाता है और इसी तरह से यदि हम Component Tree में दिखाई देने वाले Controls को UP या DOWN करते हैं, तो उससे सम्बंधित Control, Preview Screen पर अपनी Current Position से ऊपर या नीचे Move हो जाता है।
और जैसा कि हम जानते हैं कि प्रत्येक Object से Associated ढ़ेर सारी Properties होती हैं, जो उस Object को Define करती हैं, ठीक उसी तरह से प्रत्येक UI Control से सम्बंधित बहुत सारी Properties होती हैं और किसी भी UI Control की Property को Set करने के लिए हमें केवल Preview Screen पर उस Control को Select करना होता है। परिणामस्वरूप उस Selected UI Control से सम्बंधित Most Important Properties की List, Android Studio IDE के Properties Section में दिखाई देने लगती है।
उदाहरण के लिए उपरोक्त चित्र में हमने अपने Android App के Layout Control को Select किया है, इसलिए Properties Window में हमें Current Layout से सम्बंधित Most Important Properties दिखाई दे रही हैं। जबकि इसी Properties Section के Bottom में “View all properties” Link को Click करके हम Currently Selected Control से सम्बंधित अन्य कम Use की जाने वाली Properties देख सकते हैं।
हालांकि हम बिना एक भी Line का XML Code लिखे हुए भी मात्र Android Studio के Visual Tools का प्रयोग करते हुए भी अपने Android App का User Interface Visually Design कर सकते हैं, लेकिन जब हम Visually Design कर रहे होते हैं, तब भी Background में XML Codes तो बन ही रहे होते हैं और इन Automatically Generate होने वाले XML Codes को हम इसी Screen पर दिखाई देने वाले Text Mode को Select करके देख सकते हैं।
उदाहरण के लिए यदि हम हमारे उपरोक्त चित्रानुसार Visually Design किए गए User Interface के लिए Automatically Generated XML Codes को देखें, तो हमारा XML Layout Code निम्नानुसार होगा:
File Name: activity_main.xml

<?xml version="1.0" encoding="utf-8"?>
 <LinearLayout
 xmlns:tools="http://schemas.android.com/tools"
 xmlns:android="http://schemas.android.com/apk/res/android"
 android:id="@+id/activity_main"
 android:layout_width="match_parent"
 android:layout_height="match_parent"
 android:orientation="vertical"
 android:paddingBottom="@dimen/activity_vertical_margin"
 android:paddingLeft="@dimen/activity_horizontal_margin"
 android:paddingRight="@dimen/activity_horizontal_margin"
 android:paddingTop="@dimen/activity_vertical_margin"
 tools:context=".MainActivity">

<TextView
 android:text="First Number"
 android:layout_width="match_parent"
 android:layout_height="wrap_content"
 android:id="@+id/tvFirstNumber" />

<EditText
 android:layout_width="match_parent"
 android:layout_height="wrap_content"
 android:inputType="numberSigned"
 android:id="@+id/etFirstNumber" />

<TextView
 android:text="Second Number"
 android:layout_width="match_parent"
 android:layout_height="wrap_content"
 android:id="@+id/tvSecondNumber" />

<EditText
 android:layout_width="match_parent"
 android:layout_height="wrap_content"
 android:id="@+id/etSecondNumber"
 android:inputType="numberSigned" />

<TextView
 android:text="Result"
 android:layout_width="match_parent"
 android:layout_height="wrap_content"
 android:id="@+id/tvOutput" />

<TextView
 android:layout_width="match_parent"
 android:layout_height="wrap_content"
 android:id="@+id/tvResult"
 android:textSize="24sp"
 android:textStyle="normal|bold" />

<Button
 android:text="Add"
 android:layout_width="match_parent"
 android:layout_height="wrap_content"
 android:id="@+id/btnAdd" />
 </LinearLayout>
हालांकि जब हम नया Activity Create करते हैं, तो Default रूप से हमेंशा RelativeLayout ही Create होता है। लेकिन इस Example में हमने RelativeLayout को Manually Change करके LinearLayout किया है और क्योंकि LinearLayout का Default Orientation “Horizontal” होता है, इसलिए इस Example में हमने अपने LinearLayout के Orientation को “Horizontal” से Manually Change करके “Vertical” किया है, क्योंकि यदि हम इसे Vertical Set नहीं करते, तो सभी Drag n Drop होने वाले UI Controls Screen पर Horizontally Placed होते। परिणामस्वरूप Output Screen पर हमें केवल वही एक Control दिखाई देता, जिसे सबसे पहले Drag करके Screen पर Drop किया था।
ये सभी काम हम Android Studio के माध्यम से Visually भी कर सकते हैं, लेकिन फिर भी कुछ Situations में XML Codes के साथ Tweak करना तुलनात्मक रूप से ज्यादा आसान होता है।
उदाहरण के लिए यदि हम बिना XML Codes को छेड़े हुए Directly Android Studio के माध्यम से ही अपने Android App की Activity का Default RelativeLayout Change करके LinearLayout Set करना चाहें, तो सबसे पहले हमें Default रूप से मिलने वाले RelativeLayout को Delete करना होगा, और फिर Android Studio के Palette => Layouts Section से LinearLayout Control को Drag करके Screen पर Drop करना होगा।
जबकि इसी काम को यदि हम XML Code Mode में करें, तो हमें केवल RelativeLayout Tag को Change करके LinearLayout करना है और बस इतना करने मात्र से हमारे Android App का Default RelativeLayout Change होकर LinearLayout हो जाएगा।
XML Codes के साथ Deal करना इतना भी कठिन नहीं है। वास्तव में Android Studio के Design Mode में जिन UI Controls का जो नाम होता है, XML Code Mode में वही नाम XML Element का होता है जबकि Design Mode में UI Controls की जो Properties होती हैं, वही XML Code Mode में XML Element के Attributes होते हैं। यानी Design Mode व XML Code Mode दोनों में ही विभिन्न Controls के नाम, उनके Attributes या Properties के नाम तथा उनमें Specify की जाने वाली Values में किसी तरह का कोई अन्तर नहीं होता।
साथ ही Component Tree के रूप में हम जिस तरह से Controls की Positioning को Up/Down Move करते हैं, वही काम हम Controls के XML Codes की Positioning को Up/Down Move करके भी कर सकते हैं।
यानी यदि हमें किसी Control को पिछले Control से पहले Move करना है, तो ऐसा करने के लिए हमें केवल उस Control के XML Code को उसकी Current Position से Cut करके उसके Just पहले वाले Control के XML Code से पहले Paste करना होता है और Current Control की Position Change हो जाती है।
चूंकि Java एक ऐसी Programming Language है, जो ज्यादातर Programming Errors को Compile Time में ही Catch कर लेता है। इसीलिए जब हम Design Mode में App Develop करते हैं और Android Development Framework के किसी Convention को Follow करने में कोई गलती करते हैं, तो Android Studio हमें निम्न चित्रानुसार Warning Message भी देता है, ताकि हम हमारी गलती को सुधार सकें:

जैसाकि हमने पहले भी बताया कि Android Framework Recommend करता है कि हमें हमारे Android App में जितने भी String Specify करने हों, उन्हें /res/values/string.xml File में Specify करें न कि Strings को अपनी Code File में Hardcode करें।
लेकिन क्योंकि हमने हमारे Example में सभी Strings को Hardcode किया है, जिससे Android Framework Development Convention का Violation होता है, इसलिए Android Studio उपरोक्त चित्रानुसार हमें चार Warning Message Return कर रहा है और बता रहा है कि हमें Strings को /res/values/string.xml File में Specify करना चाहिए और अपनी Code File में उसे @string Statement के माध्यम से Refer करना चाहिए। यानी हमें अपने Android App की Layout File में Use की जाने वाली सभी Strings को string.xml File को निम्नानुसार Specify करना चाहिए:
<resources>
 <string name="app_name">MyApp</string>
 <string name="tv_first_number">First Number</string>
 <string name="tv_second_number">Second Number</string>
 <string name="tv_result">Result</string>
 <string name="btn_add">Add</string>
 </resources>
और एक बार सभी String Resource को Specify करने के बाद Android Studio में हम उन्हीं Resources को निम्न चित्रानुसार @string Statement द्वारा Refer कर सकते हैं:

जबकि यदि हम सीधे ही XML Code File में इन्हें Specify करें, तो हमारी XML Code File के XML Codes निम्नानुसार होंगे:
<?xml version="1.0" encoding="utf-8"?>
 <LinearLayout
 xmlns:tools="http://schemas.android.com/tools"
 xmlns:android="http://schemas.android.com/apk/res/android"
 android:id="@+id/activity_main"
 android:layout_width="match_parent"
 android:layout_height="match_parent"
 android:orientation="vertical"
 android:paddingBottom="@dimen/activity_vertical_margin"
 android:paddingLeft="@dimen/activity_horizontal_margin"
 android:paddingRight="@dimen/activity_horizontal_margin"
 android:paddingTop="@dimen/activity_vertical_margin"
 tools:context=".MainActivity">

<TextView
 android:layout_width="match_parent"
 android:layout_height="wrap_content"
 android:id="@+id/tvFirstNumber"
 android:text="@string/tv_first_number" />

<EditText
 android:layout_width="match_parent"
 android:layout_height="wrap_content"
 android:inputType="numberSigned"
 android:id="@+id/etFirstNumber" />

<TextView
 android:text="@string/tv_second_number"
 android:layout_width="match_parent"
 android:layout_height="wrap_content"
 android:id="@+id/tvSecondNumber" />

<EditText
 android:layout_width="match_parent"
 android:layout_height="wrap_content"
 android:id="@+id/etSecondNumber"
 android:inputType="numberSigned" />

<TextView
 android:text="@string/tv_result"
 android:layout_width="match_parent"
 android:layout_height="wrap_content"
 android:id="@+id/tvOutput" />

<TextView
 android:layout_width="match_parent"
 android:layout_height="wrap_content"
 android:id="@+id/tvResult"
 android:textSize="24sp"
 android:textStyle="normal|bold" />

<Button
 android:text="@string/btn_add"
 android:layout_width="match_parent"
 android:layout_height="wrap_content"
 android:id="@+id/btnAdd" />
 </LinearLayout>
Buy this eBook to read more about…
- layout_width & layout_height – match_parent & wrap_content
- Nesting of Layouts and layout_weight
 ये Article इस वेबसाईट पर Selling हेतु उपलब्ध EBook Android in Hindi से लिया गया है। इसलिए यदि ये Article आपके लिए उपयोगी है, तो निश्चित रूप से ये EBook भी आपके लिए काफी उपयोगी साबित होगी।
Android in Hindi | Page: 628 | Format: PDF
