Using C# Compiler Command Line Configuration: यदि हम GUI तरीके से Path Setup करने के बाद Notepad++ के Command को Setup करें, तो हमें Plugins => NppExec => Execute… Option द्वारा Display होने वाले Dialog Box में Commands को निम्नानुसार भी लिख सकते हैं:

यानी जब हम GUI तरीके से Path Setup कर देते हैं, तो हमें Command Line C# Compiler को Invoke करने के लिए उसका पूरा Path लिखने की जरूरत नहीं होती, बल्कि हम हमारे Computer System की किसी भी Drive व किसी भी Folder यानी किसी भी Path से C# Compiler को Invoke कर सकते हैं।
जरूरी नहीं है कि जिस तरह से इस Dialog Box में हमने हमारे Command को Double Quotes के बीच लिखा है, उसी तरह से लिखें। हम चाहें, तो Double Quotes को Remove करके हम हमारे Compiling व Run Related Commands को निम्नानुसार तरीके से भी Specify कर सकते हैं:

जब एक बार हम उपरोक्त दोनों में से किसी एक तरीके को Use करके Path Setup कर देते हैं, तो अगला Step ये होता है कि हम Notepad जैसे किसी Simple Text Editor में अपने C# Program का Source Code लिखें और उसे .cs Extension के साथ Save करें।
मानलो कि हम हमारे सारे C# Programs को “E:” Drive में CSPrograms नाम के Folder में Save करना चाहते हैं। तो इस जरूरत को पूरा करने के लिए सबसे पहले हमें “E:” Drive में CSPrograms नाम का एक Folder Create करना होगा।
इस काम को भी हम GUI या Command Prompt दोनों तरीकों से कर सकते हैं। GUI तरीका काफी सरल है और हम हमारे Daily Life में इसी तरीके से Folder Create करते हैं, इसलिए यहां हम Command Prompt को Use करते हुए ही अपनी सारी Requirements को पूरा करेंगे।
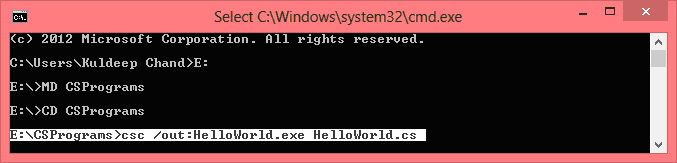
नया Folder Create करने के लिए सबसे पहले हमें Command Prompt से निम्न चित्रानुसार Command Fire करके “E:” Drive में पहुंचना होगा:

जैसे ही हम Enter Key Press करते हैं, हम निम्न चित्रानुसार “E:” Drive में पहुंच जाते हैं:

अब नया Folder Create करने के लिए हमें निम्नानुसार तरीके से MD Command Use करना होता है:

जैसे ही हम Enter Key Press करते हैं, हम निम्न चित्रानुसार फिर से “E:” Drive में पहुंच जाते हैं:

यदि यहां किसी तरह का कोई Error Display नहीं होता, तो ये चित्र इसी बात का Indication है कि हमारा CSPrograms नाम का Folder Normal तरीके से Create हो गया है, इसलिए अब हमें हमारे Newly Created Folder में Enter करना होता है।
अपने Newly Created Folder में Enter करने के लिए हमें निम्नानुसार तरीके से CD Command को Use करना होता है:

जैसे ही हम Enter Key Press करते हैं, हम निम्न चित्रानुसार अपने Newly Created CSPrograms नाम के Folder में पहुंच जाते हैं:

अब हमें हमारा C# Source Program Create करना होता है और उसे Create करने के लिए हम Windows के Notepad Text Editor को Use करते हुए निम्नानुसार तरीके से एक “Hello! World” C# Program Create कर सकते हैं:

जैसाकि उपरोक्त चित्र द्वारा हम समझ सकते हैं कि हमने हमारी C# Source File को उसी CSPrograms नाम के Folder में Save किया है, जिसे हमने Command Prompt द्वारा Create किया था। साथ ही हम देख सकते हैं कि File के नाम को हमने Double Quotes के बीच Specify किया है और हमने ऐसा इसलिए किया है क्योंकि जब हम किसी File Name को Double Quotes के बीच Specify करते हैं, तो Specified File Name के साथ Associated Extension की ही File Create होती है। यानी HelloWorld.cs” नाम की File ही Create होती है। जबकि यदि उपरोक्त File Name को Double Quotes के बीच Specify नहीं करते, तो Create होने वाली File “HelloWorld.cs.txt” यानी एक Text File Create होती है।
Source File को “E:\CSPrograms” Folder में HelloWorld.cs नाम से Save करने के बाद अब हमें फिर से अपने Command Prompt पर आना होता है और इस Source File को Compile करने के लिए हमें Command Prompt पर निम्नानुसार Command Specify करना होता है:
यदि हमारी File Normal तरीके से Compile हो जाती है, तो बिना किसी Error के हमें निम्नानुसार Output प्राप्त होता है:

जबकि किसी भी तरह की Error होने की स्थिति में हमें C# Compiler द्वारा Return होने वाला Error Message दिखाई देता है। जैसे:

यदि हमारा Program Normal तरीके से Compile हो जाता है, तो हमारे Program की एक Executable File बनती है जो कि CLR पर Run होती है। इस Executable File का नाम हमने “/out:” Parameter के साथ “HelloWorld.exe” Specify किया था, इसलिए अब इस Compiled Executable File को Run करने के लिए हमें इसी नाम को निम्नानुसार Command Prompt पर लिखकर Enter Key Press करना होता है:

जैसे ही हम Enter Key Press करते हैं, हमें हमारे C# Program का Output निम्नानुसार दिखाई देने लगता है:

हम देख सकते हैं कि हमें वही Output Message प्राप्त हो रहा है जिसे हमने “Console.WriteLine()” Method में Double Quotes के बीच Specify किया था।
इस तरह से हम समझ सकते हैं कि Command Line C# Compiler को Command Prompt के माध्यम से Use करने के लिए हमें बहुत सारे Commands को Use करना पडता है। जबकि इसी Program को यदि पिछले Section में बताए अनुसार NppExec व Explorer Plugin का Configuration करके Notepad++ के माध्यम से Execute व Run करना चाहें, तो हम इस जरूरत को भी काफी आसानी से पूरा करते हुए Notepad++ को एक पूर्ण IDE की तरह Use कर सकते हैं, जिसके विषय में अगले Article में विस्तार से चर्चा करेंगे।
 ये Article इस वेबसाईट पर Selling हेतु उपलब्ध EBook C#.NET in Hindi से लिया गया है। इसलिए यदि ये Article आपके लिए उपयोगी रहा, तो निश्चित रूप से ये पुस्तक भी आपके लिए काफी उपयोगी साबित होगी।
C#.NET in Hindi | Page:908 | Format: PDF
